Creating a connection to Azure Data Lake gen2 with Databricks
Essential in the Big Data universe, data lakes can be used in Azure. However, it is absolutely imperative to configure the service correctly to use it on a scalable and sustainable manner.
This article describes how to use Service Principal to integrate the authentication between Databricks and Data Lake and take the most out of these tools.
The creation of a Data Lake and the possibility of delivering value for businesses from a single database storage location via data processing tools, such as Databricks (Spark “as service”), is one of the most discussed topics today in the IT and Big Data universe.
In the Azure environment, this can be done by creating a Data Lake using Azure Data Lake gen2 (ADLS) and processing gigabytes or even petabytes using a scalable architecture with Azure Databricks (ADB).
How to create a connection to ADLS gen2 with Azure Databricks? What’s the best practice? How to ensure the security of your Data Lake?
First, let’s understand these tools better.
ADLS gen2 an ADB
- The ADLS gen2 is a “resource” of the Azure storage account that can be enabled at the time the account is created via the “hierarchical namespaces” flag.
- ADB is Databricks’ unified analytics platform that runs on Azure infrastructure, that is, all of its resources are similar to a standard implementation of Databricks. However, because it is enabled in Azure, its infrastructure is created on the account level see for additional details.
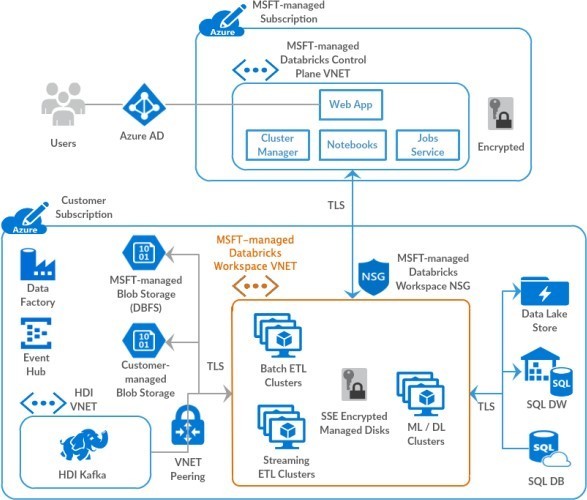
How do they communicate?
Basically, there are two ways to authenticate the connection between ADB and ADLS:
- Passthrough: The user’s credentials are sent from ADB to ADLS. To access the service, the user should have all necessary permissions. It is important to highlight that the permissions in ADLS can be associated with IAM (RBAC) and/or ACL.
- OAuth: An “application login” is configured on Databricks’s cluster or section and sent to ADLS so that all ADB’s users with this configuration will use the same parameters to access ADLS.
Accordingly, the options can be used in different ways.
The Passthrough can be used both in standard clusters – as single-user – and in high concurrency clusters for complete data teams, but it has several limitations.
For example, it is not possible to use ADB’s ACL (which is different from ADLS’ ACL), which allows to control permissions in objects of the “data” resource, with “GRANTs” and “DENYs” see for additional information nor Azure Data Factory authentication.
Yet OAuth has fewer limitations, but two hurdles:
- A far more complex configuration.
- Managing “groups” is also a bit more complex because it deals with the authentication of “apps” and not “people.”
Understanding the OAuth
Despite more complex, the OAuth connection has fewer limitations. Basically, it can be used in two ways:
- ADLS token-based authentication: we do not recommend this method, especially in a productive environment as the access via token provides users with “unlimited” access to ADLS.
- Via ID App: an app and a password are registered in Azure Active Directory (AAD) and parameters for ADB to access ADLS are created. This method has a significant restriction: it does not allow the use of ADLS’s ACL security (which enables granular security to ADLS’ objects) directly from the App ID because it is not identified by ADLS, only IAM security (RBAC).
When it comes to security, to communicate via the App ID has significant limitations. Fortunately, there is a way to use this authentication and have the necessary granular security: using the APP’s Service Principal to access ADLS.
That is, when the Service Principal is identified in ADLS security, it is possible to enable all users of an ADB cluster to use it respecting security standards (e.g. disabling editing capabilities of certain Data Lake’s layers), meaning it is a resource of utmost importance in implementations of Data Lake with ADLS and ADB.
Accordingly, it is possible to use an App’s Service Principal as a “group of users” to ensure the granular access control through ADLS’ ACL. The parameters of a Service Principal can be set up through a section of Databricks or even during the configuration of the cluster.
Configuring Service Principal
To help you in your daily tasks, below is a step-by-step guide to creating an App (and, automatically, its Service Principal), configuring a key vault scope to keep sensitive information secret in ADB and using Service Principal in the security configuration of your OAuth access. This guide is focused on the configuration of the Service Principal per section.
Do you need to configure it in the cluster? Contact Iteris’ team and tell us how we can help you.
Prerequisites:
- Only users with administrator access control of Azure’s resources can create and configure the steps below.
- Although it is not a requirement to use the Service Principal, we recommend the Databricks Premium tier Workspace (to configure the key vault).
- Be sure to have the Storage Explorer installed and updated (to download it, use the “Download” link).
Creating the App in Azure Active Directory
1. Sign in to Azure portal and search for and select Azure Active Directory

2. Select App registrations and click on +New registration
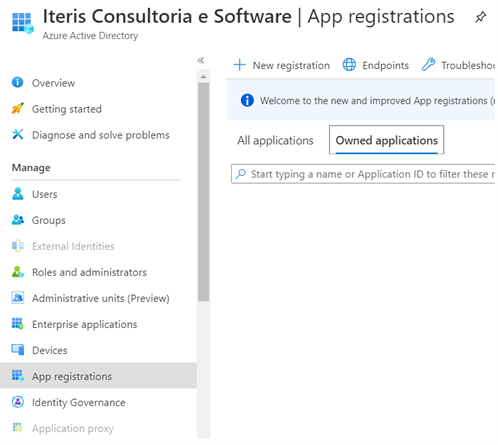
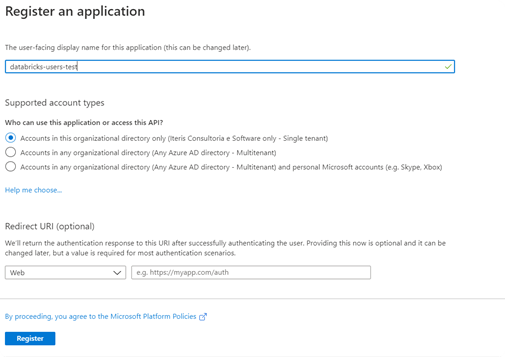
3. Enter an application name, for example “databricks-users-test,” and be sure to enable the first option in supported account types (to isolate this app from your tenant account). The other fields are optional.
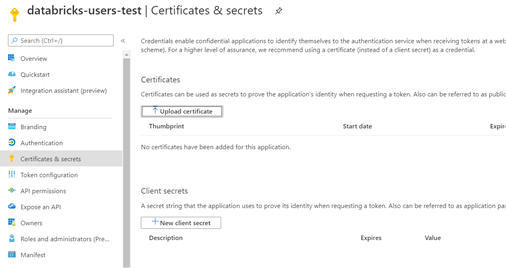
4. Go to the app’s screen in the AAD, select Certificates & Secrets and create a public key. Be attentive to the expiration value because it can affect the way the authentication works. Remember to write down the APP’S SECRET VALUE after creating it. You will need it.
5. Go back to Overview and write down the Application ID (client) and the Directory ID (tenant).

Creating a key vault and configuring the necessary secrets
1. Search for and select Key vaults in Azure portal.

2. Create an instance (it’s important to organize Azure’s resources using names according to the conventions, resource groups and subscriptions), preferably on the same location of the Databricks’ workspace. You can also use an existing instance but, should it be the case, be mindful of security and firewall settings.
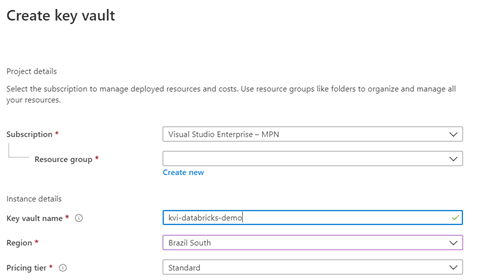
3. Open the instance and go to Secrets. We will create 3 different secrets:
- the adb-tenantId secret using the Directory (tenant) ID value.
- the adb-appId secret using the Application (client) ID value.
- the adb-appKey secret using the APP SECRET value.
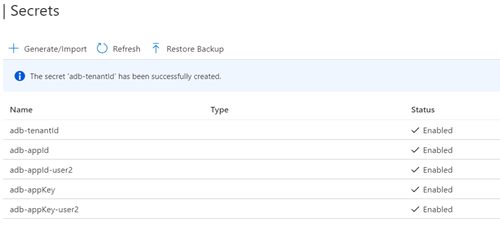
4. Go to the Properties menu and write down the DNS Name and the Resource ID.

Configuring ADB with the Key Vault
1. Access ADB workspace.
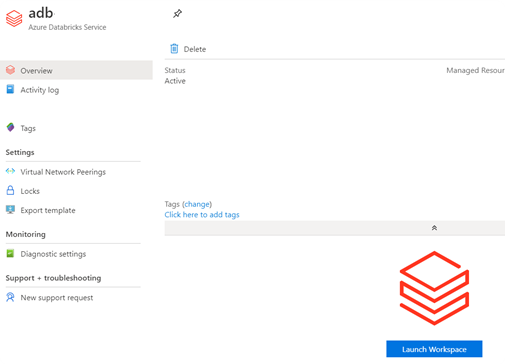
2. Go to the workspace homepage and edit the URL adding the suffix #secrets/createScope. The address will be: https://<<URL of your Workspace>>#secrets/createScope.

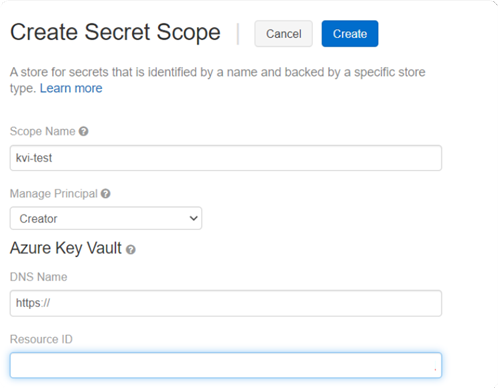
3. On the Create Secret Scope screen, enter the values and create the scope (remember to write down the scope name):
- Scope name: kvi-test (just an example – this parameter will be necessary to add the key vault’s secrets).
- Manage Principal: Creator – this parameter can be configured at a later date by Databricks CLI or Databricks APIs (check the good practices to create Secret Scopes here).
- DNS Name: enter the value copied from the key vault.
- Resource ID: enter the value copied from the key vault.
Configuring the security of ADLS with the App’s Service Principal
1. If you do not have an ADLS, you can create a new instance of the Storage Account. Remember to enable the Hierarchical namespace option in the advanced options.

2. Likewise, remember to create a new Container. You can do that in the Storage Account, in Container.
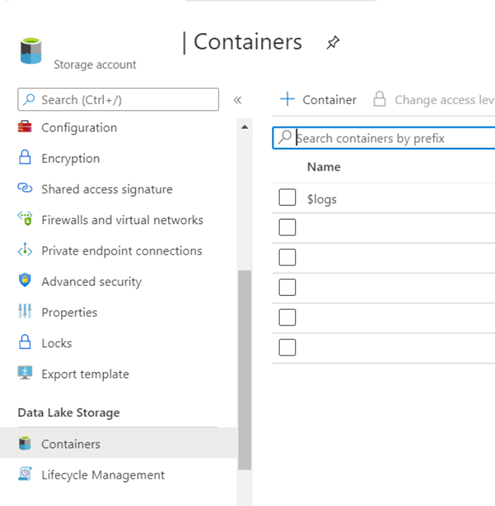
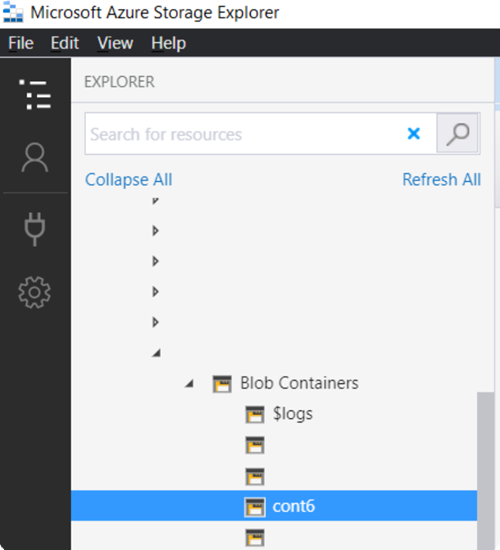
3. Access the Storage Explorer with your account, your ADLS and look for your container (e.g. “cont6” below).
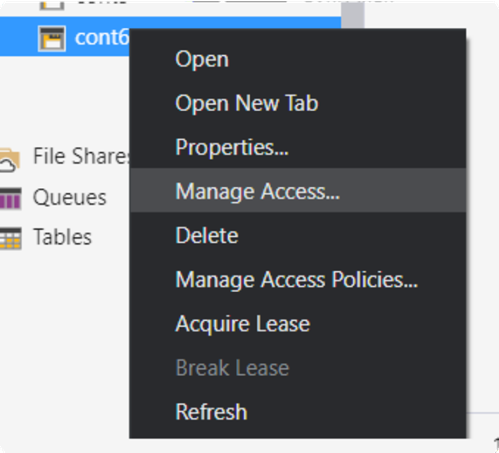
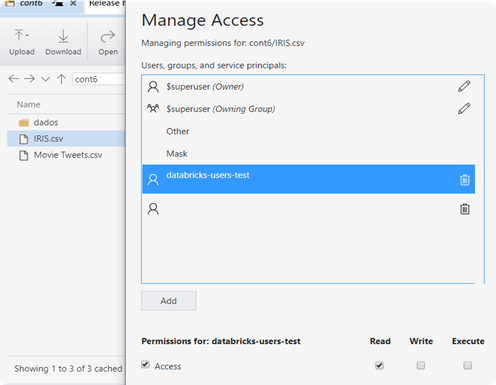
4. Right click on the container and go to Manage Access. Click on Add and search for the app’s name you have created, e.g. databricks-users-test (remember to click on search).
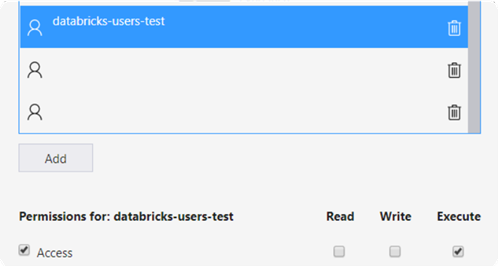
5. After selecting the user and clicking on Add, check the option Access and the option Execute. The Service Principal is required to have Execute permission on the Container level.
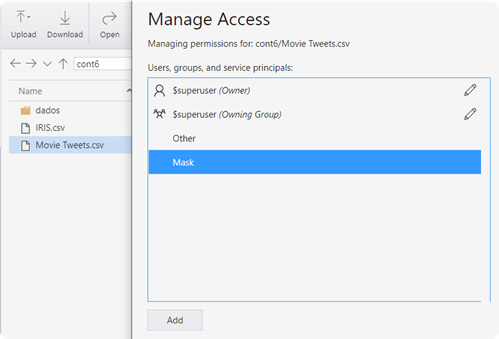
Now you can configure the ACLs, the granular accesses to each file of your ADLS using Manage Access. The step-by-step guide below uses two files as examples.
It is important to remember that the ACL permissions are not inherited in the ADLS. Therefore, if the files already exist in your ADLs, you will need to add the Read permission for each file and/or folder.
In the following example, we will add the Read permission for the “IRIS.csv” file and no permission for the “Movie Tweets.csv” file.
- Access your workspace and create a new notebook.
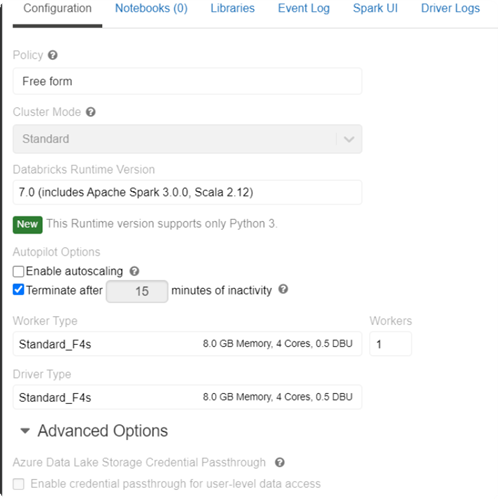
- If you do not have a cluster already configured, you can use the parameters below to create one. Remember that the “Enable credential passthrough for user-level data access” option should be disabled.
Accessing the ADLS via ADB with OAuth authentication and security in Service Principal
1. Access your workspace and create a new notebook.
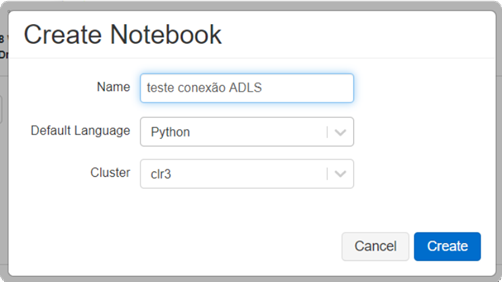
2. If you do not have a cluster already configured, you can use the parameters below to create one. Remember that the “Enable credential passthrough for user-level data access” option should be disabled.
3. Create a cell in your notebook and use the following script to configure the access to ADLS. Remember to replace the parameters for the accesses you have configured
dlname = ‘<<Storage Account>>’ ##name of your Storage Account
#Variables that pull key vault secrets (necessary parameters to access the ADLS)
appid = dbutils.secrets.get(scope = “<<secret scope do kvi>>”, key = “adb-appId”) #App ID = adb-appId
appsecret = dbutils.secrets.get(scope = “<<secret scope do kvi>>”, key = “adb-appKey”) #App secret key ID = adb-appKey
tenantid = dbutils.secrets.get(scope = “<<secret scope do kvi>>”, key = “adb-tenantId”) #Tenant ID = adb-tenantId
spark.conf.set(“fs.azure.account.auth.type.” + dlname + “.dfs.core.windows.net”, “OAuth”)
spark.conf.set(“fs.azure.account.oauth.provider.type.” + dlname + “.dfs.core.windows.net”, “or g.apache.hadoop.fs.azurebfs.oauth2.ClientCredsTokenProvider”)
spark.conf.set(“fs.azure.account.oauth2.client.id.” + dlname + “.dfs.core.windows.net”, appid) spark.conf.set(“fs.azure.account.oauth2.client.secret.” + dlname + “.dfs.core.windows.net”, app secret)
spark.conf.set(“fs.azure.account.oauth2.client.endpoint.” + dlname + “.dfs.core.windows.net”, “https://login.microsoftonline.com/”+ tenantid +”/oauth2/token”)

4. Now you can test the access to the ADLS. The example below shows it is possible to access the IRIS.csv file, but not theMovie Tweets.csvfile.


Today, Data Lake is a pivotal solution for all businesses and Azure Data Lake and Azure Databricks are disruptive tools that can actually facilitate your implementation.
Using them in cloud environments like Azure seems to be the most practical way, however, there are several aspects that should be analyzed before their adoption to maximize their value for your business on a scalable and sustainable manner.

